

Teachers’ Gifts
Sew Along With Us

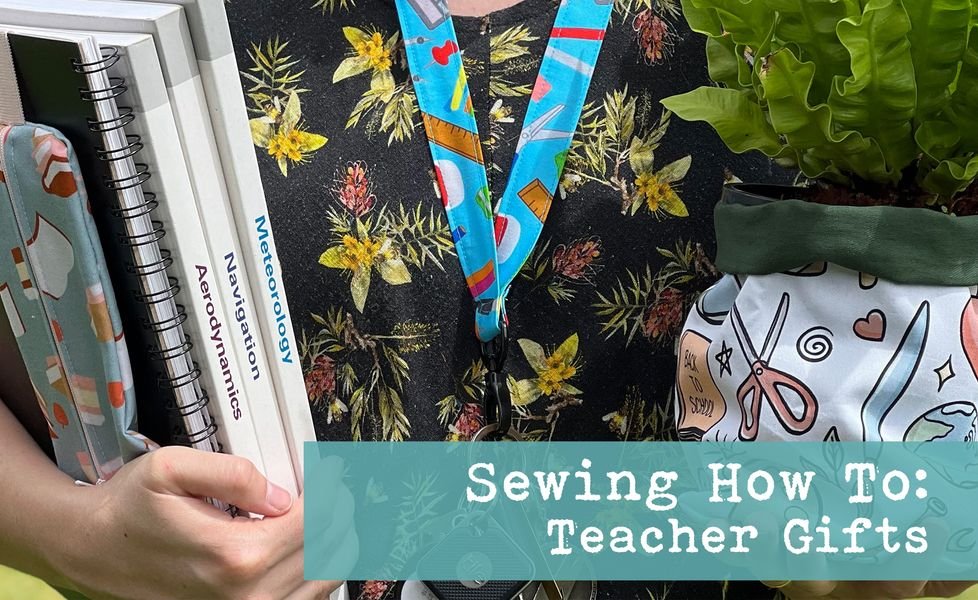
Yep, that’s right. It’s coming to the end of the year, that special time when we all sing ’tis the season to spend money fa-lala-lala-la-la-la. And one of the easily forgotten but most important gifts is for the teachers, the ones that spend so much time with your minis, teach them, guide them and frankly are superheroes in my eyes (I will never homeschool, I am not made for that) So this tutorial is to give you a few easy, teacher-friendly, make-it-from-stuff you already have, budget-aware gift ideas! And any teacher is bound to love them!
Special mention to Online Bag Supplies – Your one-stop shop for all bag hardware and cool little notions! And they’re based in WA so you’ll be supporting another small AUSSIE business by shopping with them. I regularly buy my zips and zip pulls (they have some amazingly cool ones!), and clips and hooks! You can’t go wrong! Plus for these tutorials you can grab some zips, cool zip pulls and the stuff you need for lanyards – AND they ship it out within 48hrs.
And they’ve been amazing enough to give us a discount code to share with our readers! Use the code CLOTHCUTS10 for 10% off orders over $15
Okay! Let’s start!


The “I’m a Cool Teacher” Lanyard:
What you need: – Fabric (I used Cotton Twill, but I feel like PUL would work too. Basically, anything soft with some nice fall to it) – Matching thread – Breakaway Clasp (25mm) (SHOP HERE) – Snap Hook (25mm) (SHOP HERE)

What You Have To Do:
- Cut 2 rectangles approximately 52cm x 6cm
- Iron these in half (lengthways), open. Fold all edges in roughly 5-10mm and iron down (I just trialled the fabric a few times to make sure it fit into the clasp and hook area and that it wasn’t too big or too small)


- Fold in half again and pin together
- Top stitch the entire rectangle, all the way around it


- Feed two of the ends through the snap-hook loop, fold back on itself and sew down
- The trickiest part of the entire make is now – take the lanyard and lay it on your shoulders as if it were complete, ensuring that the snap-hook end is sitting correctly. Now with the loose ends, take them to replicate how they were on your shoulders, feed each end into the breakaway clasp, and sew them into place. (I definitely didn’t do this with the first one I made and ended up with twisted bands, and yes, while the breakaway clasp can connect still, the sewn-down edges were opposite, which messes with me)
- So once those breakaway clasps are attached, you’re done! YAY!


Up next, we have….


The “Am I a Bookmark or Am I a Pencil Case” Pencil Case
Yes, this does involve a zip, BUT don’t write it off immediately; I go through step by step how to do a Spotlight zip pencil case (though I do find a zipper tap/pull option easier – and there’s so many cool options from Online Bag Supplies to match up with your fabric choice).
For this one, you will need: – Fabric (again, I used twill, but PUL or Canvas will also work – just nothing with a stretch) – Contrasting Fabric if you want to line the pencil case – Elastic – Zip (or Zipper Tape and Zipper Pull) – Matching thread – Zipper foot on the sewing machine, as well as a normal foot – A notebook that’ll probably be part of the gift, I used an A4 size book for mine


How to make it:
- Cut your fabric into rectangles approximately 2x 21cm x 6.5cm and 1x 21cm x 12cm
- You will also need a length of elastic around 41cm if making this to fit an A4 notebook
- If using zipper tape, cut this to 20cm as well. Do not attach the zipper pull until later.
- If using a 20cm premade zip (from somewhere like Spotlight), just hang tight with that zip. We’ll need it later.
- Lay the fabric out so that the wrong sides are together, and they are positioned how you would like them displayed with the zip.
- Overlock down the inside sides of the two rectangles. This will be where the zipper is attached to later.

- Now we add the zip. Take one rectangle and lay the zip top side down with the outer edges running parallel to the fabric and pin/clip in place.

- Sew along the outer edge of the zip. If using zipper tape (with no pull yet), just run the stitch all the way down.
- If using a premade zip and the zipper pull is at the bottom of your sew: you will need to pause near the zipper pull with the needle down and fiddle with the zipper pull to get to feed through to where you have just sewn. Then continue sewing as normal. If the zipper pull is at the top where you are about to begin sewing: You will need to open the zip so that the pull is farther along. Sew the open area down until you are closer to the pull. Leave the needle down and feed the zipper pull back to where you have already sewn, clear of the machine foot.


- Swap the machine over to have the zipper foot attached
- Flip the fabric over so that you see the good side of the zip and the fabric at the same time
- Sew with the fabric on top, close to the zip teeth (if using a premade zip, you will need to do the zipper pull shuffle again)


- Swap back to the normal machine foot, and attach the other side of the zip to the next rectangle of fabric as we did before (shuffling the zip pull if you need to)
- Then flip the fabric open, good sides up, and sew the fabric down in place next to the zip
- If you are using a separate zipper tape and zipper pull, you can now feed the pull onto the tape. If you feed it on and put the pull roughly in the middle of the zip without opening any teeth, it should make the next step easier too.
- Once finished, your zip area should look like this (and YEP! you just completed a zip, told you it was easy!)


- So now we add the elastic. I used an A4 notebook for this; if you’re using a smaller book, you’ll need less elastic.
- Take the elastic and attach it to each side of the zipper with the raw edges matching and the excess looped in the middle. You will need to shift the zipper pull if you’re using a premade zip. Also, be careful to avoid the metal stoppers when sewing, as these will most certainly break your needle. I marked on the elastic where the metal bits were (just with a pencil) so that I knew where not to sew. Also, make sure you are sewing on the inside of the metal bits; this will ultimately mean they are cut off by the overlocker later.
- Sew in place

- Take the back pieces of your pencil case fabric (with the wrong sides together) and lay them onto the elastic zip mess so that the outer fabric is facing.
- Pin/clip into place.
- You may want to feed the excess elastic out through the zip so that it doesn’t accidentally get caught in the overlocking.
- Overlock around the 4 edges, being careful not to hit those metal bits if you’re using a premade zip.
- Take the overlocker tails and either tie off or thread them through on themselves to finish them off.
- I sew over the zip ends a few times just for extra security

- Now, flip the pencil case back out the right way around, and you’re done!

And our last tutorial for the week…

The Pot Plant Cover-majig
But saying that you don’t have to use this for plants alone, you could add a vase and gift some flowers, or suggest the teacher use it as a nicknack holder on their desk. You could make one for a plant and one for accessories. The possibilities are endless.
What you’ll need: – A pot (whether its empty or has the plant in it for gifting – just make sure it has a drip tray so the plant doesn’t saturate your creation) – Fabric, canvas, the thicker, the better (I used twill for the print and drill/canvas for the contrasting colour and wish I had used canvas for both, mine is a bit floppy)
Find the print I used here – Back to School by Back My Stitch Up Design
Now to make it:
- First, you will need to take your pot base/tray and trace it onto your fabric, then add roughly 2cm to make it a bigger circle (measure the diameter of this circle cause you’ll need it soon)
- Cut the circle out. You will need one in each fabric print/colour you’re using (these are for the base)
- with the measurement of the circle’s diameter, you’ll need to grab a calculator (and there just happens to be one on your phone), so take that measurement and multiple it by pi / 3.14 (for example, 17cm diameter of the circle so 17cm x 3.14 = 51.38cm)
- That will be the length of your rectangle, but you also need to figure out how tall you want the pot cover to be, so measure the height of your pot and add 4-5cm so that you can fold it down to show the inside fabric. (eg. pot is 20cm tall, so the rectangle will be 51cm x 25cm)
- Cut two of these rectangles out – so now you should have 2 rectangles and 2 circles.


- Take one rectangle and, fold it in half with shorter sides together, sew it down.
- Repeat this with the second rectangle

- Now to make the pot shape, you will need to clip the rectangle tube to the circle. Right sides together and raw edges aligned. Clip or Pin it into place
- Sew in place. Take your time on the machine, as it can be a bit awkward to sew.
- Repeat this for the second fabric

- Turn one of the baskets so that it is the good side facing out, and then feed that one inside the other basket, raw edges to line up and pin in place.
- Sew around the outer edge to attach the pots to each other BUT make sure you leave a turning hole
- Turn it out the right way around using that hole you left.
- Feed the inside pot cover back into the exterior pot cover so that you have an almost-finished creation
- Sew the turning hold shut by feeding the raw edges back inside and pin it in place, sew this down (make sure you use a matching coloured thread so it’s not super obvious)
- (Optional: Top stitch the entire top edge)


- Iron the planter cover so it looks good, then pop your plant in, fold the top edge down and voila! Awesome plant cover
